
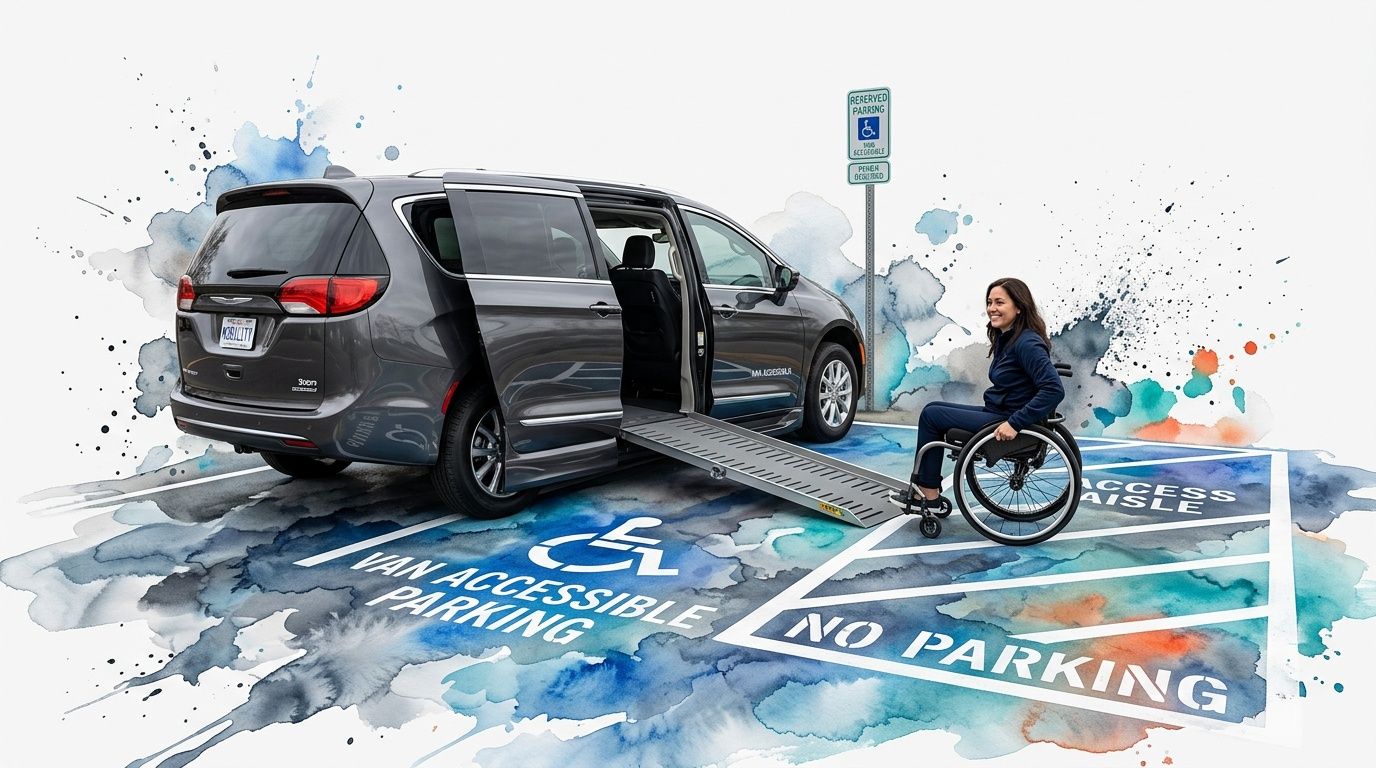
If you're planning a new lot or reworking an older one, disabled parking space dimensions need to be correct before paving starts. A standard accessible space is 96 inches wide with a 60-inch access aisle, and van spaces require either a 96-inch aisle or a 132-inch stall with a 60-inch aisle, with slopes held to 1:48 (2.08%) per ADA parking dimension guidance.
Quick Answer
Disabled parking space dimensions are strict. A standard accessible stall needs 96 inches of width plus a 60-inch access aisle, while van-accessible spaces need either a 96-inch stall and 96-inch aisle or a 132-inch stall and 60-inch aisle. The surface also has to stay at no more than 1:48 slope in any direction to remain usable and compliant.
Introduction
You might be looking at a site plan, an old parking lot, or a permit set and wondering whether the disabled parking layout is going to pass. That concern is justified, because most problems don’t start with paint. They start with bad grading, poor drainage, or a layout that looked fine on paper but didn’t fit the site.
In California, property owners have to think about both the federal ADA baseline and Title 24. In practice, that means the stricter requirement usually controls, especially on projects in Santa Rosa, Sonoma County, Monterey County, and across the California Central Coast where older sites, tight access, and uneven grades make compliance harder than it looks.
Understanding ADA vs. California Title 24 Requirements
Property owners often hear “ADA compliant” as if that settles the issue. It doesn’t. The ADA sets the federal minimum, but California code can add tighter requirements or more specific details, so the job has to satisfy both.
That matters early. If the parking count, access route, stall placement, striping, and finish grades are based on only one standard, the project can end up needing rework after inspection.
The practical rule on California jobs
On California projects, the safest approach is simple. Build to the more demanding requirement when there’s a difference.
One example appears in van access aisles. The parking requirement guidance notes that California CBC mirrors ADA but mandates van aisles at 98 inches minimum in some locales, while ADA-based van layouts are commonly built from the federal dimensions listed in this accessible parking requirement reference. That’s exactly why local review matters.
Practical rule: Don’t treat federal dimensions as the whole answer on a California site. Check the local plan set, jurisdiction comments, and Title 24 requirements before grading starts.
Compliance is more than a stall count
A compliant layout isn’t just a box drawn in the corner of the lot. The accessible spaces need to connect to the entrance on a usable route, and the route itself can’t be defeated by excessive slope, standing water, or awkward transitions.
That’s why site contractors, designers, and owners need to be looking at the same thing. A parking stall that technically fits the dimensions but sits on bad grade is still a problem.
Standard Accessible Parking Space Dimensions
A standard accessible stall often gets laid out correctly on the plan, then fails in the field because the access aisle was treated like leftover space. On a real job, the aisle has to be built into the layout, grading, striping, and curb work from the start.
For a typical car-accessible space, the stall is 96 inches wide and the adjacent access aisle is at least 60 inches wide. The aisle runs the full length of the stall. Local layouts often use a stall length in the common parking range, but the width and usable aisle are what usually drive compliance problems during construction.

What the full-length aisle means in practice
Full length means full length. A planter nose cannot clip the aisle. A curb ramp cannot push into it. A flare, wheel stop, sign base, or overbuilt curb return cannot steal usable width at either end.
I see this most often on retrofit lots and small coastal parcels where every foot feels spoken for. Owners look at the striping and see enough room near the front of the stall, but inspectors and users need the aisle to stay clear from end to end.
That is a site prep issue as much as a striping issue. If the subgrade falls away toward the aisle, crews sometimes try to correct it late with asphalt thickness or patching, and that usually creates new slope and drainage problems instead of fixing the original one.
Where standard spaces can share space efficiently
Standard accessible spaces can be paired with a shared access aisle. That saves width and can make a tight lot work, especially when the accessible route to the entrance is short and direct.
The catch is coordination. Shared aisles only work if the grades are controlled, the curb lines are set correctly, and drainage is handled before paving. On the Central Coast, I pay close attention to how water moves across the stall and aisle because a shallow low spot can leave ponding right where a wheelchair user needs a dry, stable surface.
If you are checking a plan before layout starts, it helps to know how the civil sheets, grading plan, and striping details fit together. This guide on how to read blueprints for excavation work helps catch conflicts before they turn into sawcutting and rework.
Van-Accessible Parking Space Dimensions
Van spaces need more room because they have to work with ramps and lifts, not just car doors. Many parking plans are often inadequately sized for this reason.
The two accepted configurations are clear in the verified guidance. Option A uses a 96-inch parking space with a 96-inch access aisle, for a total width of 192 inches. Option B uses a 132-inch wide space with a 60-inch aisle. The wider aisle must be on the passenger side for lift deployment, and that aisle cannot be shared.
Why the aisle matters more than the stall
On van spaces, the access aisle performs the essential function. The stall holds the vehicle. The aisle is what gives a wheelchair lift or ramp room to deploy safely.
That’s why the wider aisle has to stay clear and why trying to “borrow” space from landscaping, wheel stops, or a curb return usually causes trouble. If the deployed lift can’t function in the aisle, the space may meet a drawing but fail in real use.
Van space count also affects layout
The verified parking count guidance states that at least one of every six accessible spaces must be van-accessible. That means van space planning can’t be left until the end of the layout process.
A common mistake is placing all accessible spaces first, then trying to turn one into a van stall after the fact. That usually creates conflicts with route width, sign placement, or adjacent circulation.
The van space should be laid out early, not squeezed into whatever space is left.
The Importance of Surface Slope and Grading
Most parking guides stop at dimensions. In the field, the hardest part is usually the surface itself.
The standards require a maximum slope of 1:48 (2.08%) in all directions, and published guidance also notes that there is minimal practical information on how excavation contractors should assess existing terrain, calculate cut-and-fill requirements, or integrate ADA-compliant parking into hillside or sloped properties in places where topography is difficult, as described in this discussion of handicap parking slope challenges.
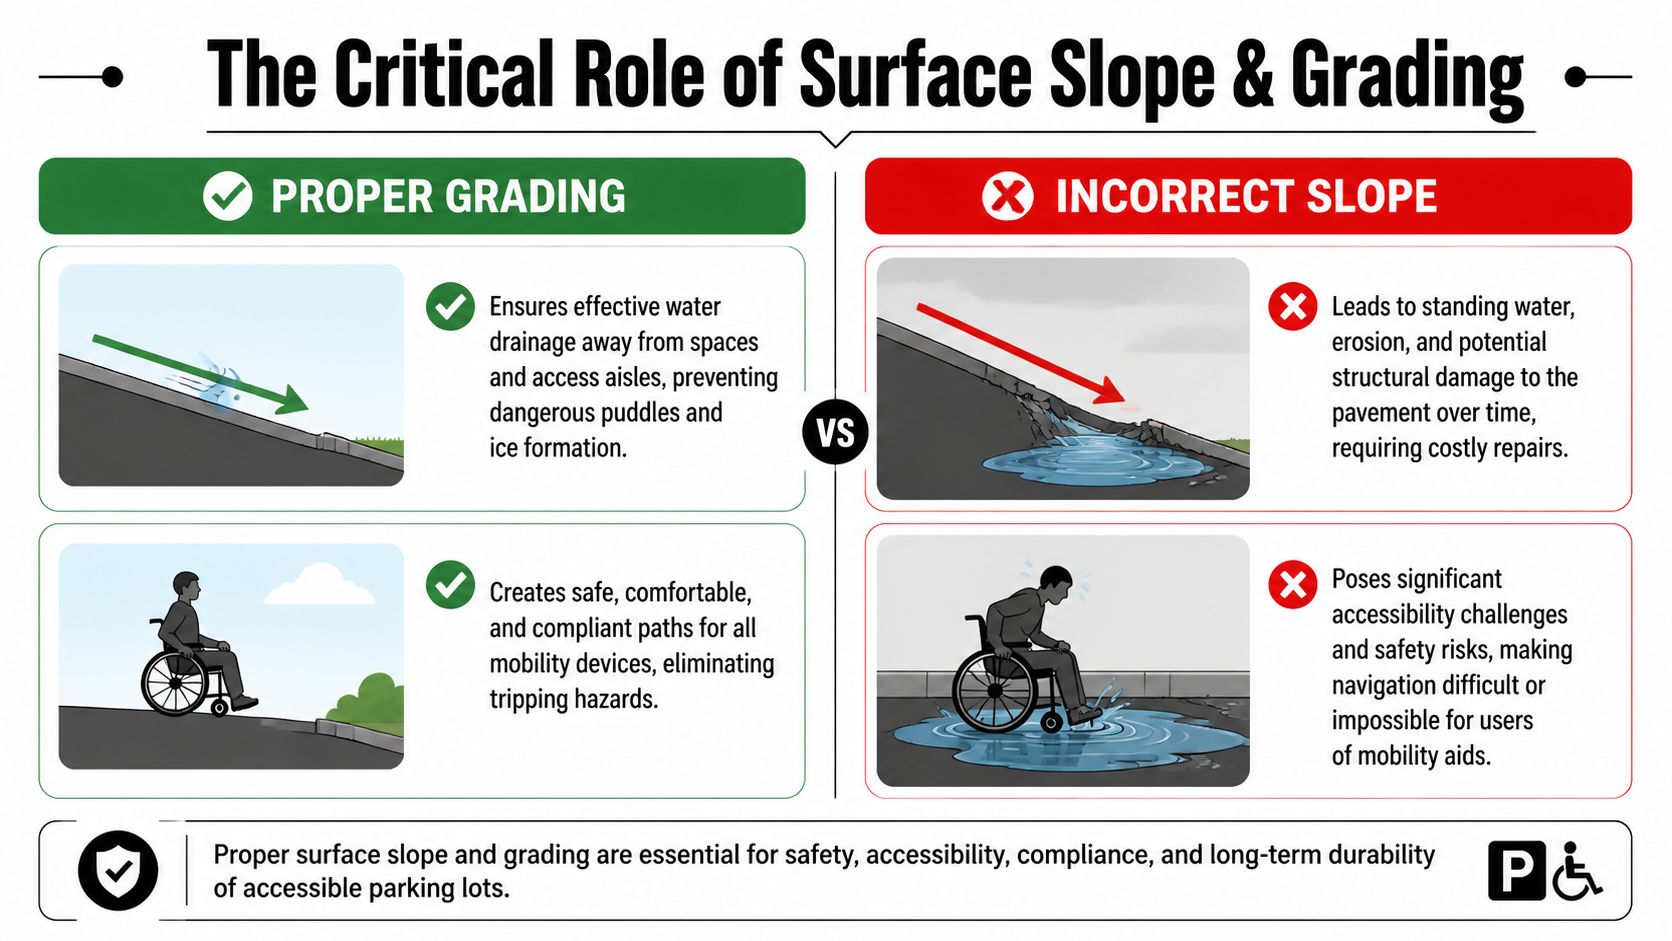
Why slope is where projects get into trouble
A stall can have the right width and still fail if the pavement tilts too much. Wheelchair users need a surface that doesn’t force rolling, twisting, or awkward transfer angles.
On sloped sites, this gets harder fast. The natural ground may want to drain one way, the building entrance may sit at a different elevation, and the accessible route may need a flatter transition than the rest of the lot.
Grading has to solve two problems at once
The grade needs to satisfy accessibility and move water. If the crew flattens the area without thinking about drainage, water can collect in the stall or aisle. If they chase drainage too aggressively, the surface can exceed the slope limit.
That balancing act is why accessible parking should be treated as a precision grading area, not just another corner of the lot.
- Existing terrain matters: Older sites often have uneven settlement, patched asphalt, or drainage that was never designed for an accessible route.
- Cut and fill need coordination: On a hillside or split-grade parcel, flattening one section can create edge conditions, retaining needs, or water flow problems elsewhere.
- Finish grade depends on subgrade: If the underlying soil moves later, the finished surface can drift out of compliance even if it passed on day one.
What works and what does not
What works is setting the accessible area early, controlling elevations carefully, and checking transitions before base rock and paving go in. What doesn’t work is trying to fix a bad grade with paint, extra striping, or a last-minute asphalt feather.
If you’re not sure whether the lot was graded correctly in the first place, this article on how to tell if grading was done right gives a practical way to evaluate the work.
A parking lot usually fails accessibility in the dirt phase long before anyone installs signs.
Required Signage and Pavement Markings
A compliant stall still needs to be identified clearly. Signage and striping make the space visible, enforceable, and understandable to drivers before they park in the wrong place.
The verified guidance requires post-mounted signs with the International Symbol of Accessibility, using the white symbol on a blue background, with the bottom edge at least 60 inches above the ground. It also notes that aisles must be delineated with clear painted lines, commonly yellow or white.
What to check on the sign package
Look for the symbol first, then height, then visibility. A sign that sits too low can disappear behind parked vehicles, which defeats the point.
Van spaces also need the correct designation. On real jobs, sign placement should be coordinated with curbs, bollards, sidewalks, and door swings so the sign doesn’t create a new obstruction.
What the striping needs to do
The striping has to define the stall and the access aisle clearly. The aisle should be visibly marked so drivers understand it’s not an extra parking area or loading zone.
A few field checks help:
- Aisle clarity: The aisle lines should be easy to see after the lot is in service, not just on the day it’s painted.
- No conflicts: Striping shouldn’t run into curbs, ramps, utility lids, or wheel stops in a way that confuses the usable area.
- Readable from the driver approach: Drivers should recognize the accessible space before turning into it, not after they’ve already crossed the aisle.
How Many Accessible Spaces Do You Need
The required number of accessible spaces depends on the total number of spaces in the parking facility. The count is not guessed, and it’s not based on what feels reasonable for the site.
The verified guidance gives a tiered minimum under the 2010 ADA Standards. It requires 1 accessible space for 1 to 25 total spaces, 2 for 26 to 50, 3 for 51 to 75, 4 for 76 to 100, 5 for 101 to 150, 6 for 151 to 200, 7 for 201 to 300, 8 for 301 to 400, 9 for 401 to 500, and 2% of the total for 501 to 1000, with at least one of every six accessible spaces van-accessible, as shown in this ADA parking count reference.
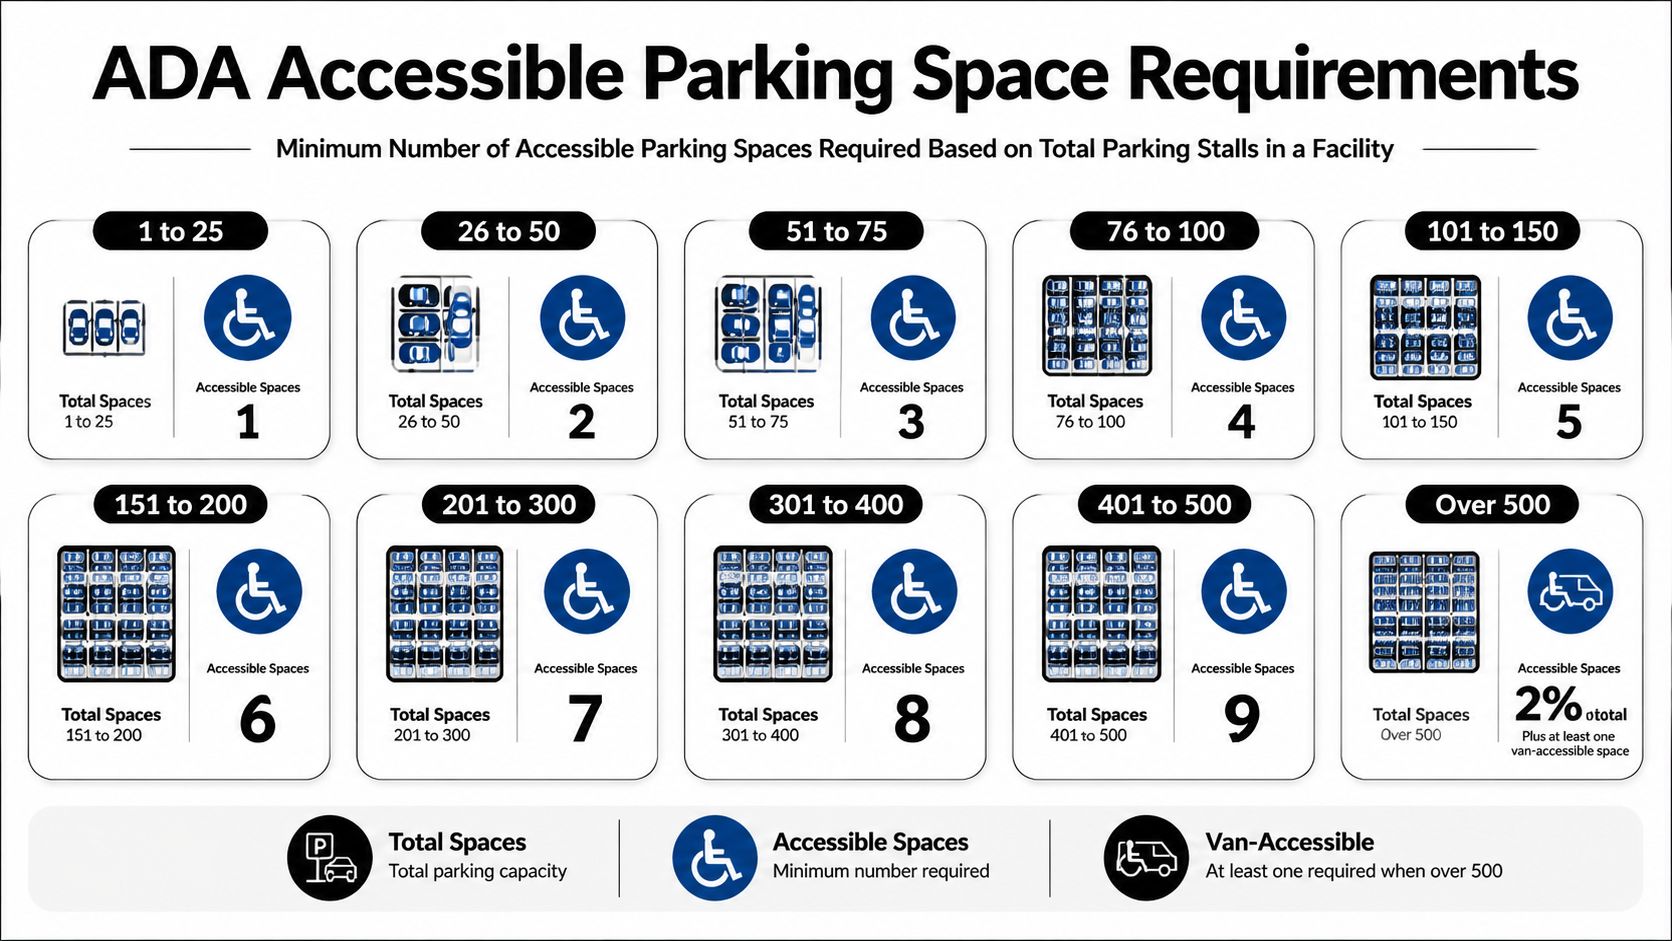
Quick count reference
| Total parking spaces | Minimum accessible spaces |
|---|---|
| 1 to 25 | 1 |
| 26 to 50 | 2 |
| 51 to 75 | 3 |
| 76 to 100 | 4 |
| 101 to 150 | 5 |
| 151 to 200 | 6 |
| 201 to 300 | 7 |
| 301 to 400 | 8 |
| 401 to 500 | 9 |
| 501 to 1000 | 2% of total |
Where owners make mistakes
The biggest mistake is counting too late. If the stall count changes during design or value engineering, the accessible parking count can change with it.
The second mistake is forgetting the van requirement while laying out the lot. That usually shows up after civil work is done, when correcting the problem is more expensive and more disruptive.
Site Preparation for a Durable and Compliant Lot
The parking dimensions are the visible part. The part that keeps them compliant is underneath.
The verified guidance for contractors ties ADA parking to precise subgrade preparation, including compaction to 95% Proctor density, a 4-inch minimum asphalt thickness over a 6-inch aggregate base, and drainage integration during construction. That matters because accessible stalls can’t stay compliant if the base settles, the pavement cracks, or water starts softening the section.

The dirt work comes first
If the subgrade is loose, wet, or inconsistent, the finished stall won’t stay where it was built. Crews can stripe a perfect layout on top of a bad base, but time will expose it.
A sound process usually includes excavation to the right depth, proofing the subgrade, correcting weak areas, and compacting the surface before base rock is placed. Accessible stalls need the same attention you’d give any precision paving area, sometimes more.
Drainage and durability are tied together
Water is one of the fastest ways to ruin an accessible parking area. If runoff crosses the aisle, sits at the stall edge, or undermines the base, the pavement will move and the grades will change.
That’s why the drainage plan has to be considered with the accessible layout, not afterward. For readers comparing paving systems and slab performance in other markets, this overview of Atlanta commercial concrete expertise is a useful example of how concrete planning and structural support affect long-term performance on commercial surfaces.
What solid prep usually includes
- Subgrade compaction: The verified contractor guidance calls for 95% Proctor density so the surface has stable support under traffic and weather.
- Base section: The same guidance specifies a 6-inch aggregate base under the asphalt section.
- Pavement thickness: It also calls for a 4-inch minimum asphalt thickness for durability in accessible parking construction.
- Drainage coordination: Water has to move where the design intends without creating ponding in the stall, aisle, or route.
Good site preparation is what keeps a compliant stall compliant after use, weather, and time start working on it. If you want a better sense of what supports pavement life beyond the finish surface, this article on what really makes pavement last is worth reviewing.
Build the accessible area like it has to hold its grade for years, because that’s exactly what inspectors, owners, and users will expect.
Frequently Asked Questions About Accessible Parking
Can I just repaint my existing lot to make it compliant
Sometimes, but not always. If the stall widths, access aisle, route, or surface slope are wrong, paint alone won’t fix the problem. Older lots often need grading, patch removal, or reconstruction in the accessible area.
What’s the biggest mistake to avoid
Treating accessible parking like a striping issue is the biggest one. The common failures usually come from slope, drainage, and layout conflicts that should have been solved before paving.
Do I need to rebuild the whole parking lot
Not necessarily. Some projects only need targeted work in the accessible stalls, access aisles, and route to the entrance. The site has to be evaluated as a whole so partial repairs don’t create new problems at the transitions.
How long does this kind of correction usually take
That depends on the condition of the site, the amount of grading required, drainage issues, and whether permits or inspections are involved. A simple restripe moves much faster than work that includes excavation, base repair, and paving.
What if my property is on a slope or hillside
That’s where planning matters most. Sloped sites can still work, but the accessible parking area usually needs careful cut-and-fill, drainage control, and tighter grade verification than a flat parcel.
How do I know what my project will cost
Cost depends on layout changes, earthwork, paving limits, drainage corrections, and site access. The best move is to get a site-specific estimate instead of guessing from general parking lot pricing.
Get Your Site Plan Right From the Start
Disabled parking space dimensions aren’t forgiving, and the grading underneath them matters just as much as the paint on top. If a project is being planned in Sonoma County, Monterey County, or the California Central Coast, it makes sense to sort out access, grades, and layout before construction starts. Reviewing how to get a site plan approved faster can help you catch issues early.
If you need a practical review of disabled parking space dimensions, grading, drainage, or site prep, DW Excavation, LLC can help you look at the project before expensive rework starts. Call (707) 601-9091, visit 470a Caletti Avenue, Windsor, CA 95492, or go to dw-excavation.com to schedule a free estimate or site consultation.