
That sinking feeling you get seeing water pool up against your foundation after a heavy California rain is something no homeowner wants to experience. For many, it's a recurring nightmare, and the culprit is almost always the same: uncontrolled water flow. The most effective, permanent solution isn't a quick fix—it's a professional grading fix for flood risk designed to protect your property for the long haul.
Why Proper Grading Is Your First Defense Against Flooding

When water has nowhere to go, it finds the easiest path. Unfortunately, that's often against your foundation, into your crawl space, or right into the middle of your yard, turning it into a swamp. This isn't just an eyesore; it’s a direct threat to your home’s structural integrity and property value.
Proper grading is the art and science of reshaping your land to create a gentle, consistent slope that guides water safely away from your home. Think of your property as a system where every surface—from the driveway to the lawn—works together to manage stormwater. When the grade is off, that system breaks down, and that’s when expensive problems start.
What is Positive Drainage?
At the heart of any good grading job is a simple concept: positive drainage. All this means is that the ground immediately surrounding your home slopes downward and away from the foundation. The goal is to give water a clear exit path so it never gets a chance to stand still or flow back toward your house.
So, what does a correctly graded property look like?
- It has a minimum slope of 2-3%. That’s a drop of about a quarter-inch to a half-inch for every foot you move away from the foundation, especially within the first 10 feet.
- The surfaces are smooth and continuous, without low spots where water can collect.
- It often includes strategic channels, like swales, that direct runoff toward a safe discharge point like the street or a storm drain.
Without positive drainage, you're rolling out the welcome mat for water damage. Saturated soil puts immense hydrostatic pressure on foundation walls, which can lead to cracks, leaks, and even bowing over time. To get ahead of the problem, check out our expert grading tips before the rain hits.
Why is Ignoring Flood Risk a Financial Gamble?
Putting off drainage issues is a huge financial gamble, particularly here in California where atmospheric rivers and intense storms are becoming more common. Cumulative global flood losses have topped USD 1.2 trillion over the last 30 years [Swiss Re Institute, 2021].
For homeowners in places like Sonoma County and along the Central Coast, proper grading is one of the smartest, most cost-effective investments you can make. It protects your property value and helps you avoid devastating repair bills.
A proper grading fix for flood risk isn’t just a repair; it’s an investment in your property's future and your peace of mind. It stops water damage before it can start, saving you from much more expensive foundational work down the road.
Ultimately, reshaping your land is about taking control. It turns a reactive headache—dealing with water after it causes a problem—into a proactive, permanent solution. By establishing the right slope and drainage paths, you create a resilient property ready to handle whatever Mother Nature throws at it.
How To Spot Drainage Problems On Your Property
Before you can even think about a grading fix, you have to play detective on your own land. Understanding the subtle—and not-so-subtle—signs of poor drainage is the first step. Honestly, a simple walk around your yard after a good rainstorm can tell you almost everything you need to know.
The most obvious giveaway? Standing water. If you've got puddles that are still hanging around more than 24 hours after the rain stops, that’s a dead ringer for saturated soil. Water has nowhere to go.
Performing A Visual Inspection
Beyond the obvious puddles, you need to look for clues that water is actively fighting against your home. Zero in on the area right around your foundation and where your downspouts empty out. Water pooling there is a direct threat to your home's structural integrity.
Keep an eye out for these tell-tale signs during your walk-around:
- Foundation Stains: Check your concrete foundation walls for damp patches, visible water lines, or a white, powdery crust called efflorescence. That's a clear sign moisture is being wicked up from the soil right into the concrete.
- Soil Erosion: See any bare patches of dirt? Or maybe little channels carved into the ground, especially near downspouts? That means water is flowing with enough force to strip your topsoil away.
- Cracked Patios or Walkways: When the ground gets waterlogged, it can swell up and heave. This movement is powerful enough to crack or shift heavy concrete slabs.
- A Spongy Lawn: If your yard feels like a wet sponge long after a storm has passed, you're likely dealing with a high water table or heavily compacted soil that just can't absorb any more water.
A common mistake we see is homeowners thinking a simple downspout extender is a cure-all. If the ground it empties onto doesn't slope away from the house, you've just moved the problem a few feet over. You're still letting all that water saturate the soil right next to your foundation.
Before calling in a pro, it helps to gather your own intel. A quick property assessment can give you a clearer picture of what's happening.
DIY Flood Risk Assessment Checklist
Use this checklist to identify common flood risk indicators around your property before consulting an expert.
| Area of Inspection | What to Look For (Red Flags) | Actionable Note |
|---|---|---|
| Foundation Perimeter | Standing water, damp stains on concrete, efflorescence (white powder) | Water pooling here is a major risk. Note the location and depth. |
| Lawn & Garden Beds | Puddles lasting >24 hours, spongy or squishy soil, bare patches from erosion | These are low spots that need to be addressed with grading or drains. |
| Downspout Outlets | Water pooling at the outlet, soil washed away, extenders pointed at the house | The discharge point needs to be at least 10 feet from the foundation. |
| Patios & Walkways | Cracks, uneven or sinking slabs, water pooling on the surface | Indicates soil saturation and heaving, a symptom of poor drainage. |
| Overall Yard Slope | Ground appears to slope toward the house instead of away from it | This is the most critical issue; the grade needs to be reversed. |
This checklist will help you spot the most common culprits and have a more productive conversation with an excavation contractor.
How Can You Check The Slope Yourself?
Speaking of slope, it's the most critical piece of the puzzle. You can get a rough idea of your property’s grade with a surprisingly simple tool: a string level.
Grab two stakes and hammer one into the ground right next to your foundation. Place the other about 10 feet away, directly out from the first one. Tie a string tightly between them, clip a line level to the middle, and adjust the string on the far stake until the bubble is perfectly centered. Now, measure the distance from the string down to the ground at both stakes.
For decent drainage, the ground at that second stake should be at least 3-6 inches lower than the ground at your foundation. If it's not, you've found a major problem.
How Does Local Topography Increase Your Risk?
Your property doesn't exist in a bubble. The surrounding landscape—especially in the varied terrains of Monterey County or the hills of Sonoma County—plays a huge role. If your home sits at the bottom of a hill, you're in the direct path for every drop of runoff from the properties above.
Even on what looks like a flat lot, a neighbor's grading can send their water problems straight into your yard. Understanding these outside factors is essential for designing a drainage solution that actually works. For more on this, our homeowner's guide to residential excavation explains how site conditions shape the project.
Effective Grading And Drainage Solutions That Work
Once you've spotted the red flags of poor drainage, it's time to look at the proven techniques that make up a real grading fix for flood risk. An effective strategy is rarely about a single fix; it’s about combining the right tools for your property's specific challenges.
The goal here is to move past temporary patches and build an engineered system that manages water from the moment it hits your property until it's safely away. Floods are now the most common natural disaster worldwide, making up over 40% of all weather-related disaster events in 2023 [Statista, 2024]. This drives home why California homeowners need to be prepared.
This decision tree shows how seemingly small issues like puddles can quickly escalate into serious problems like foundation damage or erosion, signaling it’s time for a professional grading assessment.
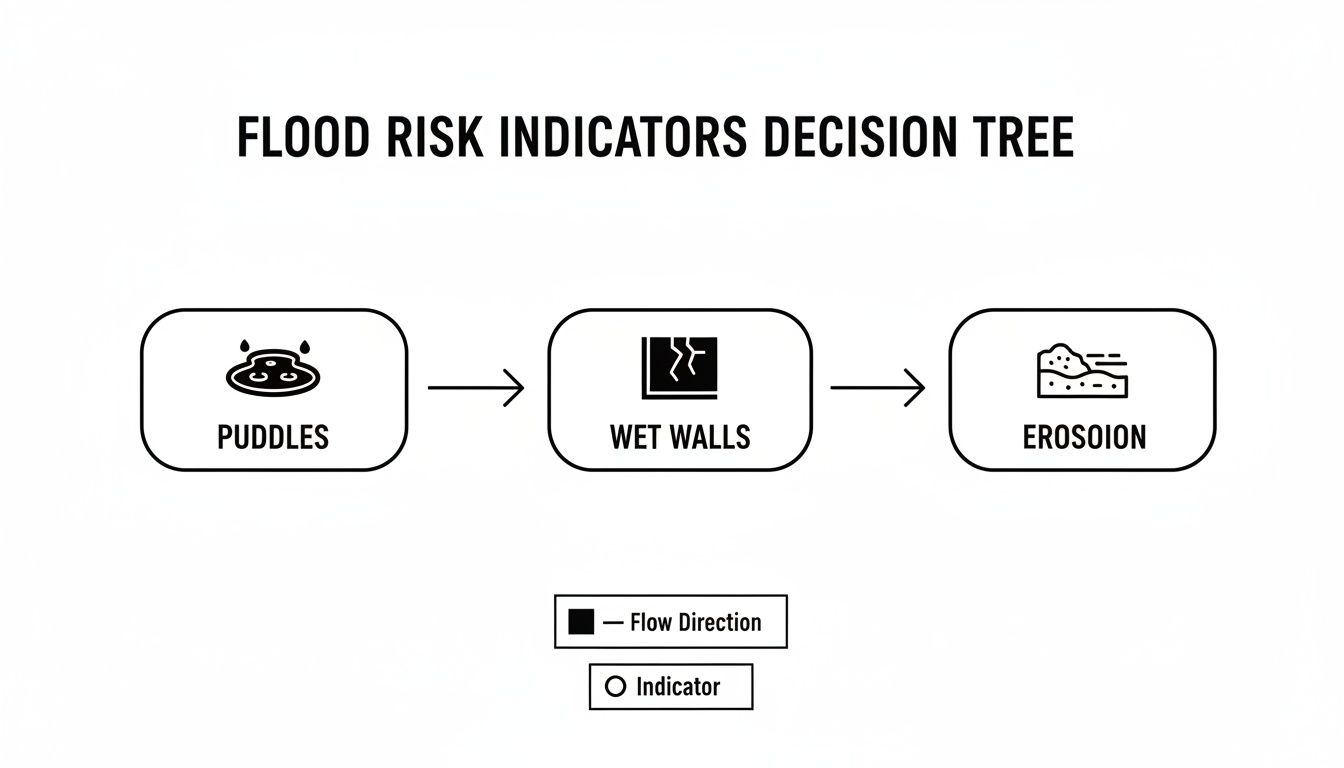
As you can see, what starts as a persistent puddle often leads to wet foundation walls, which can cause soil erosion. It's a clear path of escalating risk that a proper grading fix is designed to stop in its tracks.
What are Swales and How Do They Redirect Water?
One of the simplest yet most effective tools in our arsenal is the bioswale, or just a swale. Think of it as a broad, shallow channel with gently sloping sides, usually lined with grass or native plants. Its job is to catch surface runoff and guide it away from your home toward a safe spot, like a street curb or a storm drain.
A swale is a perfect grading solution for a property with a big, open yard where sheet flow—that thin layer of water moving across the surface—is the main problem. Unlike a harsh, deep ditch, a well-designed swale blends right into the landscape.
What is a French Drain and When is it Needed?
But what if the problem is happening underground? For those perpetually soggy lawns or areas with a high water table, a French drain is often the best answer. This subsurface system is basically a perforated pipe laid in a trench filled with gravel.
Here’s a quick rundown of how it works:
- A trench is dug with a slight downhill slope, starting from the problem area.
- A layer of gravel goes in, followed by the perforated pipe (we always place the holes facing down).
- The trench is then backfilled with more gravel and usually topped with soil and sod so it disappears from view.
Excess groundwater seeps into the gravel, enters the pipe, and gets carried away. This is the go-to fix for relieving hydrostatic pressure against a foundation or drying out a waterlogged patch of your yard, especially common here in Sonoma County with our heavy clay soil.
A classic scenario we see is a home built at the bottom of a slope. During heavy rains, the hillside gets saturated, and that underground water pushes directly against the foundation. A strategically placed French drain along the uphill side of the home acts like a protective underground moat, intercepting this water before it ever reaches the foundation walls.
How Do Retaining Walls Help Control Slopes?
For properties on the steep hillsides of the California Central Coast, erosion isn't just a nuisance; it's a major threat. Uncontrolled runoff can strip away valuable topsoil and destabilize an entire slope. Here, a retaining wall is far more than a decorative feature—it's a critical piece of structural engineering.
A professionally engineered retaining wall serves two key purposes:
- It holds back soil, creating level terraces that are more usable and far less prone to erosion.
- It must incorporate a solid drainage system behind the wall, typically using gravel and a perforated pipe, to relieve the immense pressure that water-saturated soil can create.
Without that integrated drainage, a retaining wall is just waiting to fail. But when done right, it transforms a difficult slope into a stable, functional part of your landscape. Learning about integrating erosion control and water management solutions is key to understanding how these systems work together.
The Professional Grading Process From Plan To Execution
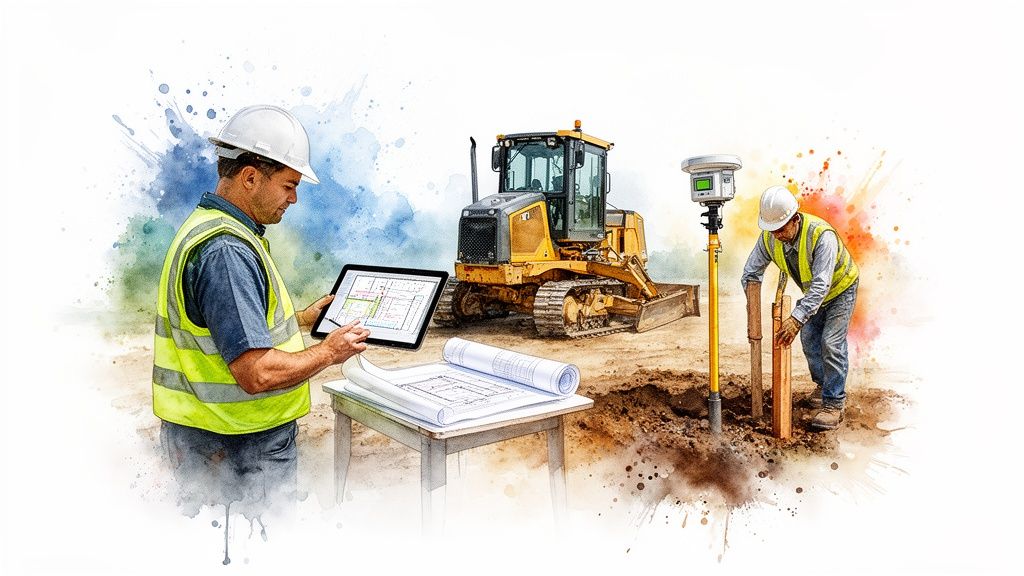
Hiring a professional to handle your property’s grading can feel like a bit of a black box. But any reputable contractor follows a clear, logical process from the first conversation to the final walkthrough. Understanding these steps helps demystify the work and gives you confidence that your investment is being handled with skill and precision.
It’s a systematic approach, ensuring every grading fix for flood risk is built on a solid foundation of data, experience, and expert planning. The whole project kicks off not with a bulldozer, but with a conversation and a detailed site walk.
Phase 1: Initial Consultation and Site Analysis
This first step is all about gathering intel. A grading expert will walk your property to analyze its unique characteristics, looking closely at existing slopes, soil composition, and any potential obstacles. One of the most critical parts of this phase is identifying and locating all underground utilities.
During this analysis, we’re looking for a few key things:
- Soil Type: Is it the expansive clay so common in Sonoma County, or the sandy loam you find along the Central Coast? The type of soil dictates the equipment we’ll need and how we approach compaction.
- Existing Drainage Patterns: We map out where water is currently flowing and, more importantly, where it’s getting stuck.
- Utility Locations: Before any dirt moves, we coordinate with utility locators to mark all gas, water, electric, and communication lines. Safety is non-negotiable.
Phase 2: Design and Permitting
Once we have a complete picture of your property, the next move is to create a detailed plan. This isn’t just a rough sketch on a napkin; it's an engineered design that specifies the exact slopes, elevations, and drainage features needed to solve your water problems for good.
Many projects, especially those involving significant soil movement, require a permit from local jurisdictions like Monterey or Sonoma County. This process ensures the work meets strict safety standards. You can learn more about what is a site plan and who can help make one to see how these documents guide the entire process.
A common frustration for property owners is a project that looks great on the surface but fails during the first major storm. This almost always comes down to a lack of proper planning. The design phase is where we create a lasting solution on paper before a single scoop of dirt is ever moved.
Phase 3: Site Preparation and Execution
With the plan approved and permits in hand, the real work begins. This phase is typically broken down into three distinct stages, each one building on the last to achieve the precise grade needed to protect your home.
- Site Preparation and Clearing: First, we clear the work area of any obstacles—vegetation, rocks, old debris.
- Rough Grading: This is the heavy-lifting stage. Using equipment like bulldozers and excavators, we reshape the land according to the design plan to establish foundational slopes.
- Final Grading and Compaction: Here, precision is everything. We switch to smaller equipment and use advanced tools like GPS grading systems to hit the exact final elevations. The soil is then properly compacted to prevent it from settling later on.
What Does a Grading Fix Cost in California?
Whenever we start talking about a grading fix for flood risk, the conversation always lands on one crucial question: How much is this going to cost? There’s no simple price tag, but if you understand the key variables, you can budget effectively and see the project for what it is—a long-term investment in your property's safety and value.
The final cost of any grading and drainage project in California is shaped by a handful of critical factors. The price will always reflect the complexity of the solution needed.
Key Factors That Influence Your Project's Cost
A grading project can be as simple as a minor lawn re-slope or as complex as a multi-layered drainage system. Naturally, the price will move up or down based on the specific challenges your property throws at us.
Here’s what really drives the cost:
- Property Size and Accessibility: A bigger yard simply requires more time and machine work. A tight, hard-to-reach site in Windsor or Monterey might demand smaller, specialized equipment, which can influence the final cost.
- Severity of the Slope Issue: Correcting a slight negative grade is a much less intensive job than re-engineering a steep, erosion-prone hillside.
- Soil Conditions: Heavy clay soil, which is common in parts of Sonoma County, is a lot tougher to excavate and compact than sandy loam.
- Required Drainage Solutions: A basic regrading job is the most straightforward. The price climbs as you add complex elements like French drains, retaining walls, or underground piping.
It's easy to see a grading fix as just another expense. But it’s a critical investment that protects your home's foundation—your single largest asset—from potentially catastrophic water damage. The cost of prevention is always a fraction of the cost of foundation repair.
The need for these solutions is only growing. Globally, an estimated 1.81 billion people now face significant flood risk [World Bank, 2022]. This statistic underscores why proactive water management is no longer optional for homeowners in vulnerable areas. You can learn more about this global challenge on the World Bank's climate change blog.
Hypothetical Cost Scenarios
Let's make this more tangible with a few examples. A small, relatively flat yard in a suburban neighborhood that just needs a simple regrading to create positive drainage would likely fall into a more modest price range.
Now, picture a larger property on a Central Coast hillside struggling with severe erosion. That's a different story. This kind of project would probably need extensive grading plus an engineered retaining wall and a comprehensive French drain system. This type of multi-layered grading fix for flood risk is a more significant investment, but an absolutely essential one. You can explore our range of professional grading services in California to see how we tailor these solutions for different properties.
Frequently Asked Questions About Grading for Flood Risk
Even when you have a good handle on the plan, it’s completely normal to have questions before breaking ground. Here are some of the most common questions we hear from homeowners about fixing their property's grading and drainage—answered directly.
How long does a typical grading project take to complete?
The timeline really hinges on the scope of the work. For a simple lawn regrading on a standard lot, we can often be in and out in just one to three days. However, more complex jobs, especially on sloped properties in Sonoma County involving French drains or retaining walls, could take a week or more.
Will grading work destroy my existing landscaping?
This is probably the number one concern we hear, and we take it seriously. Before we start any digging, our team will walk the property with you to identify and flag everything that matters—sprinkler heads, irrigation lines, and valuable plants. While some disturbance is inevitable, we go to great lengths to minimize the impact and protect your yard.
Can I do a grading fix myself to save money?
For small landscaping tasks, DIY is great. But when it comes to a real grading fix to protect your home from water damage, the stakes are just too high. Getting the slope wrong, even by a tiny margin, can accidentally channel water toward your foundation instead of away from it, making the problem worse. Professionals use precision tools like laser levels to ensure accuracy.
What kind of maintenance is required after my property is regraded?
One of the best things about a professional grading job is that it’s designed to be a permanent, low-maintenance solution. Your main job is simple: just keep the drainage paths clear. Make sure swales and the outlets for French drains are free of leaves, grass clippings, and other debris that could block water flow.
Do I need a permit for grading work in California?
Permit requirements vary by city and county. In places like Sonoma or Monterey County, you generally need a grading permit if you're moving a significant amount of soil or changing drainage patterns, particularly on hillsides. A key part of our service is handling the entire permitting process for you, which takes all the guesswork and paperwork off your plate.
Ready to solve your property's drainage problems for good? The team at DW Excavation, LLC brings an engineering-first approach to every grading and excavation project, ensuring a permanent solution that protects your home. Contact us today for a professional site assessment.